| Table of Contents |
|---|
Adding CSS to Graphic
In Graphics Builder, the user has the ability to drag and drop in any CSS file and it will automatically work within the graphic.
Below we'll be explaining how to:
Create simple CSS file for beginners
Add CSS file
Overwrite Existing CSS file
Reuse Existing CSS file
Check if CSS file exists on graphic
Deleting CSS file
SVG Fill Tip
Create simple CSS file for beginners
...
To do this, the user can go do a Google search for "cursor css". We selected the second result from W3Schools, which took us here: http://www.w3schools.com/cssref/pr_class_cursor.asp. From there, we can find the available properties for the cursor.
In their Example, they have a button "Try it Yourself >>" that will then take you to another page where it'll show you examples as you mouse over each different type of property on the right side. Check it out here. The The user can check to see which one they would like to use. In our case, the cursor property we are looking for is "pointer". Another way to check each one is to open an online code editing source such as as CodePen to to see the changes live. Once in CodePen, select "+New Pen" at the top right corner.
...
In this example, we added "<div class = "cursorChange bkChange">Check this out!</div>" inside the HTML editor box. Our class names we chose are "cursorChange" and "bkChange". You can see that this line of code generates "Check this out!" in the console below it. When you mouse over it, it still does the normal thing because we haven't yet defined what our class does.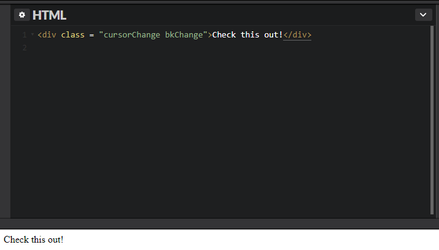
...
Now we want to define what our classes do. So we add the below code inside the CSS editor box. We are specifying our class names we chose which are "cursorChange" and "bkChange" following a dot/period before it. Then define what it does inside the curly brackets. In this case, we want the cursor to change to the "pointer" property so we specify it as "cursor:pointer;". Then we want to add the second class to change the background to light blue when mousing over the text. The class for "bkChange" will include hover as well. Notice, that "hover" has to follow the class name with a colon. The property to change is "background-color" so it should be "background-color: lightblue;". They should look like below. Once you add them, you can mouse over the "Check this out!" text in the console and see the hand icon and background change once moused over.
...
| Note |
|---|
Don't add the same CSS file multiple times. Look at the "Check if CSS file exists on graphic" section on how to check if there are multiple if you think you accidentally added more. |
...
Standard label with no class
...
Label with only cursorChange class
...
Label with only bkChange class
...
Label with both cursorChange and bkChange classes
...
Overwrite Existing CSS file
If the user wants to overwrite the existing CSS file with same name but with their new changes, they need to overwrite the existing file through Folio app not drag and drop again. Dragging and dropping again would create another file in Folio with the same name but different id. You would then need to remove the one you don't need/want in both the graphic first then in folio files.
...
Then the user can select the CSS file from there to import.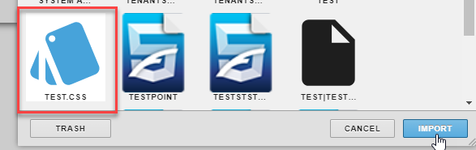
...
Check if CSS file exists on Graphic
...
Then query for "style" to find the CSS file.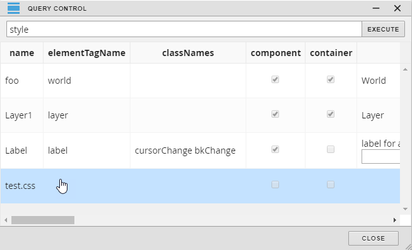
...
Check CSS file across all graphics
If the user wants to find out which graphics are using a particular CSS file, they can do so following the below steps. That way the user can know which graphics have it and can be affected if CSS file is removed. Look at the "Deleting CSS file" section first before deleting a CSS file!
First, in Folio app, query for the CSS files available in the database by using this:
readAll(file).findAll(x=> x→file.toStr.contains("css"))Then copy the id of the CSS file you would like to search for in the graphics. You can find the id if you select the 'i' icon on the left side of the record returned.
Then run this query but replace the id with the one you copied in step 2:
readAll(fin5).findAll(x=> x.readFinFile.find(y=> y["src"].toStr.contains ("@p:demo:r:2650abda-202eff25")) != null)That would return you the list of graphics that have that CSS file if any. Now you know which graphics to open and delete the CSS file if needed.
Deleting CSS file
If the user wants to delete the CSS file to replace it completely instead of using the overwrite method above or just to completely get rid of it, they would first have to get rid of it in the graphic then the database.
First open the graphic that has the CSS file you wish to delete and using the above method to check for it. Then once you find the CSS file, scroll to the far right and select the "trash" icon to remove it from the graphic first.
Then save the graphic. Now that graphic doesn't have a reference to the CSS file in the database. You can now delete the CSS file from the database in Folio files (Folio → Menu → Files → CSS).
...
For SVG fill properties, the Graphics Builder property will override the CSS due to how this was designed. To remove or make the fill property on the SVG component so that we can apply the CSS class to it, we created the program below that runs on the world. This will only be executed once and that is when the graphic is first loaded. Then the CSS will apply to the SVG. You can modify if needed, but below program will be applied to all SVGs. If you want only certain SVGs, you can add a unique tag to those and include that tag in the program.
Program Name = Remove SVG Fill
Filter = world
Code =
queryAllqueryAll('svg and fill').forEach(function(itm){ itm.fill = undefined; });
...