How the System Integrator sets up the Tenant Reporting
Here is the documentation on what the System Integrators need to do to setup the tenant reporting. We have created the Tenant Reporting that allows the user to create reports for selected tenants that displays detailed usage and billing for tagged equips. The user can also generate a report that displays summary of the total amount owed by each selected tenant and the total amount of all selected tenants. This tool can send the reports right away or allow the user to create jobs that will generate reports automatically at the frequency they desire.
The available features this Tenant Reporting supports are:
- Company Logo
- Property Manager, Tenant, and Property Info
- Date and site
- Summary Totals of All Tenants
- Individual tenant details of usage
- Schedule Report - now, daily, weekly, or monthly
- Report Generation: Individual or Compiled
- Misc additional fees
Prerequisite:
- You'll need the finHtmlReporting pod and have it enabled. Refresh browser after enabling.
- You'll also need to have the Email SMTP settings configured in the Host > Settings . Then make sure a user has a valid email to receive the reports.
- You'll also need to enable the html2pdf extension.
Setup Property Manager for Reporting
The user will first create a property manager following this doc: Manage Property Managers.
Then be sure to add a Ref property tag by the name of "propertyManagerRef" to the site they manage. You'll need to copy the id of the user and paste it in there without the "id==" portion.

How to setup Points for Reporting
If the user has their own logic for their "trigger point" and/or their own point, all they have to do is go to the DB Builder app add an "occupancyIndicator" marker tag to a point that will be used to determine whether its equip is in use. Also make sure the point is trended.

Optional: IF they will like to use our logic that works based on schedules, they will create a Boolean point named "Trigger Point" and be sure to give it the "occupancyIndicator" tag, enable Has History to collect every 5-15 mins and make sure its writable.

IF using our logic, the user must have the tenantScheduleDifferences Logic Builder program added. Download required Logic Builder program here and upload it in the Logic Builder app using the Restore option. Its going to run on equips that have the vav and zoneMaster tags.

Setup Tenants for Reporting
The user will then create a tenant following this doc: Manage Tenants.
Setup Equips for Reporting
The user will need to specify which equips will be tracked and billed per tenant. To do this, the user has a couple ways. One is to go to the DB Builder app > Equip Tree and select the equip. Then the user will go to Tools > Reports > to select Add Tenants to Equip. The second way is to to go the FIN Reports > Tenant Reporting > Add Tenants to Equip.
The user will be prompted with the below pop up where they can choose which tenant to assign to the equip. As well as if they will be charged hourly or by usage.
- Charge Hourly -
- Charge by Usage -

After selecting to apply a tenant, it will add "zoneMaster" marker tag, tenantRefs property string tag with id of tenant user, and isPercentage boolean tag depending if charging hourly (false) or by usage (true) to the equip.

How to Setup Schedules for Reporting (If using our logic)
NOTE: This is only if you are applying our logic with the program mentioned above when setting up points for reporting. If a site has a predetermined schedule of operation but a tenant needs to be there earlier or stay later, they can create their own schedule (regardless if it overlaps with normal hours) and they will be billed for the extra time outside of the normal hours.
The user would need to create a schedule if one doesn't exist already for their end user (tenant schedule) and normal business hours (master schedule). Select the type of schedule and default values. Also add either "masterSchedule" or "tenantSchedule" marker tags to them depending on what the schedule is for.
After the schedule has been created, the user can tag it multiple different ways.
- By selecting the Edit icon after opening said schedule in the Schedules App
- By selecting the Edit button on the bottom bar when selecting schedule in the Schedules Tree (DB Builder)
- By selecting the 'i' icon next to schedule in the Schedules Tree (DB Builder)


After creating schedules, the user wants to set the normal hours of operation of the "masterSchedule". If its a "tenantSchedule", set an earlier or later time duration to bill them outside of normal hours. The tenants can set this themselves when they think they will need extra time.

Setup Equips for ScheduleRefs
In order to use our logic based on schedules, the user must apply the following tags to their equips so that the program uploaded earlier can work:
- masterScheduleRef - this will be a Ref property tag that will refer to the master/normal schedule of the building set by the owner. Make sure to add the masterSchedule marker tag to the master schedule to make it appear in the browse menu to select it.
- tenantScheduleRef - this will be a Ref property tag that will refer to the schedule set by the tenant. Make sure to add the tenantSchedule marker tag to the tenant schedule to make it appear in the browse menu to select it.
tenantCommand - this will be a Boolean property tag that will be turned on when the tenant schedule is not overlapping with the normal schedule. The tenantScheduleDifferences program will add it automatically when it runs on the targets. Do not add it manually or else program will throw an error.

After all that, the user will now be able to generate reports.
Generating Reports
The user will go in the Users app

Then, once inside the app, the user will navigate to Tools > Tenant Reporting > to select Tenant Reports.

After "Tenant Reports" is selected there will be a popup window containing a list of users tagged as tenants. The user should select the tenants they want to create reports for.
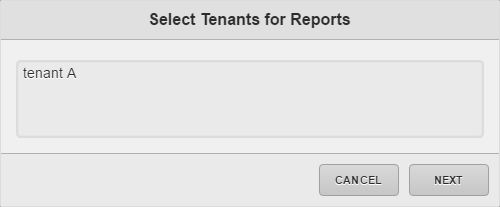
Once the users has checked all the tenants they want reports for, they should click the "Next" button and another popup window will appear with options for the reports.

The following options will be available:
- Time filter: Use this drop-down list to choose a time period for which you want the reports to reflect. Time Spans with "This" in front will report on that current time span while those with "Last" will report on the previous time span. ("This Month" = current month so far, "Last Month" = the entire preceding month.)
- Email address: Choose the email you wish to send the report to. This drop-down list will contain the names of all tenants as well as users tagged as "propertyManager".
- Email subject: Choose what you would like the subject to be. If nothing is entered, it will default to "Finstack Report on 2017-05-18 for <tenantName>"
- Report Schedule: Choose when to send these reports. "Send Now" will email the reports as soon as each one is completed. The other options will create a job to send reports automatically: "Daily" will send a report everyday, "Weekly" will send reports every 7 days, and "Monthly" will send reports on the first of each month at 9 AM.
- Set Date Format: This allows the user to choose the date format they would like to appear on the report. A configuration prompt for this will appear after the user hits apply. Look below for extra details regarding this. If not configured, its set to this default Monday, 01/01/2016
- Individual Forms: Selecting this option will send an email with a detailed report for each tenant selected.
- Compiled Form: Selecting this option will send one email per site containing a summary of each tenant selected.
After selecting all the options desired, the user will click "Apply" and the reports will be created or if Set Date Format was selected, the below pop up will appear.

The available options here are:
- Include Weekday: This allows the user to modify how the date will appear on the report. None means it won't include the day text, just date (ie- 2016-01-01). Abbreviation will include the day text abbreviated (ie- Mon, 2016-01-01). Full Text will include the whole day text (ie- Monday, 2016-01-01).
- Delimiter: This allows the user to choose how the date is separated. (2016-01-01 or 2016/01/01 or 2016.01.01)
- Date Format: This allows the user to choose the date format. For example in Europe, the common date format is DD/MM/YYYY where as in the US is MM/DD/YYYY. There are plenty of other options the user can choose from.
Once the user clicks "Apply", the user is done.
Adding your logo
If you wish to include your company logo in the report, all you have to do is upload your logo image in the Files section of Legacy Folio app.
Once you do, make sure to add a "logo" marker tag on the image. The report will automatically look for that tag and add the image to the report. If it doesn't exist, it'll just create the report without it.

Here is an example report with our J2Innovations logo at the top left corner.

New example for individual and compiled reports.
Individual Compiled


Editing Jobs
When a report is generated for either daily, weekly, or monthly, a job is created in the background that will then execute for whatever frequency was selected.
If for whatever reason the frequency of when to send a report needs to change, it can be done through the Job app. The system integrator will go to the Job app and edit the job for that particular report.
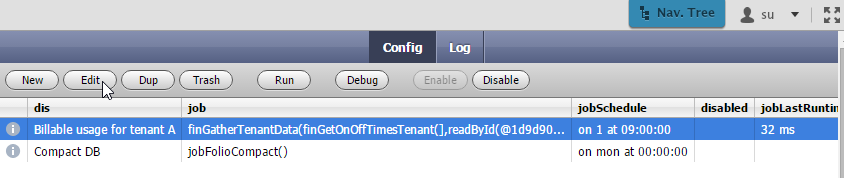
They will then select the job they wish to edit and select the Edit button. After that, a pop up will appear with the available properties to edit.
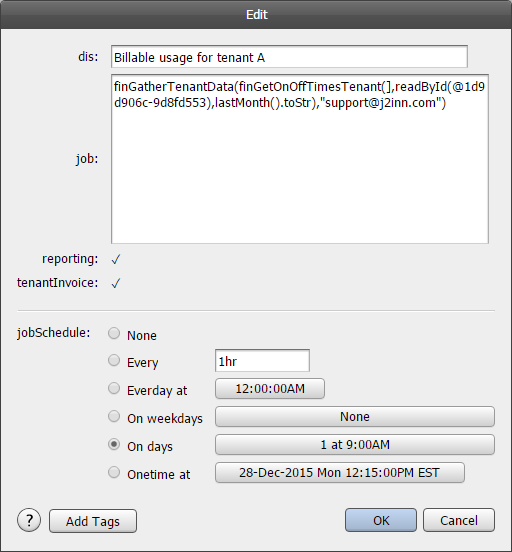
The following properties that can be edited are:
- dis - the display name of the job
- job - the function that runs the report (not recommended to change unless you know what you are doing)
- reporting and tenantInvoice - are marker tags needed for the reports
- jobSchedule - when to send reports
Once changes have been made, hit the "Ok" button and it will apply the changes.
If the user wishes to stop receiving reports for a time being, the job can be disabled by clicking on the Disable button.
If the job is no longer needed, it can be deleted by clicking on the Trash button.