Builder Panels Menu (Left)
The Left Builder Menu contains important panels that allows you to choose from multiple views that help you with the graphic building process.
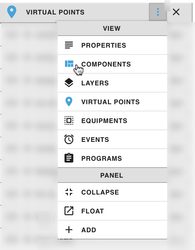
Panel options
Collapse
Collapses the selected the panel
Float
Float allows for the selected panel to be un-docked. Once the Panel is floated, you can move the panel to any location within the browser/graphic builder window.
Add
Adds an additional Panel into the left menu.
Panel Menu Views
Properties
Properties is the most commonly used Panel View. In here you can virtually view/edit/add/remove any object or component's property within the graphic (including the background of the graphic itself).
The 'Properties' view has 2 different sections: Basic & Advanced.
Classes
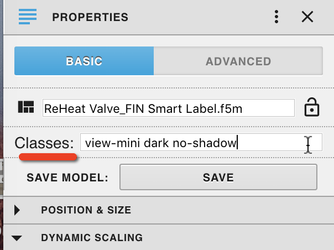
The 'Classes' property in the Graphics Builder allows users to add in special classes on certain components to change they way they look or act.
Users can add in their own CSS and Classes by following this guide: Adding CSS to Graphic
A list of available Graphic Builder Classes: GB Classes
Basic

In the 'Basic' section you will also find most basic properties that are available to that component such as:
- Background: Choose between a Color or Image as a background. Selecting Image gives you the option to upload, position, and repeat/norepeat for the image.
- Content Layout: Allows you to choose how the components are laid out & organized. Absolute, Horizontal, Vertical, centered, left aligned..etc etc.
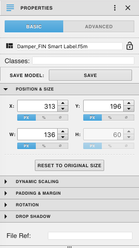
- Position & Size: Adjust X & Y positions, Width, and Height
- Dynamic Scaling: When enabled, allows you to adjust the scaling of the object. Initial Size, Grow %, Shrink %.
- Border: Gives the object a border and determines how it will appear
- Drop Shadow: Allows you to add or remove a drop shadow effect
- Rotation: Allows you to rotate your component
- More TBA
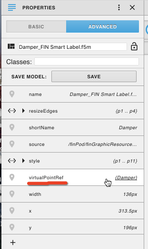
Advanced
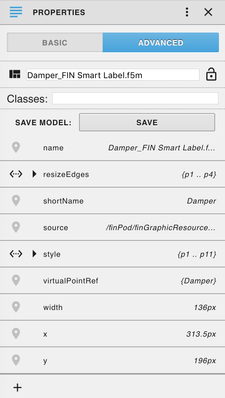
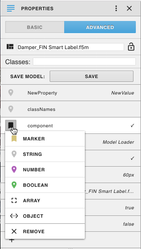
The advanced section of the properties view contains tags and property tags that belong to that component. Here you can Add, Edit and Remove tags to any selected component or object in the graphics builder.
The '+' button on the bottom left allows you to add a new tag/property tag to the component.

The Icon to the left of the tag gives you the option of editing the property type or removing the tag all together:
An advanced property worth nothing is the "virtualPointRef" which indicates what point is bound to that component:
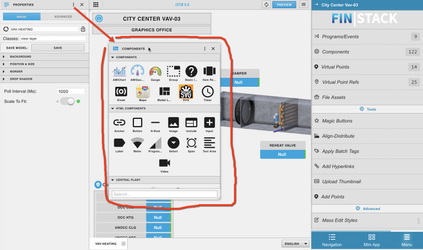
Components
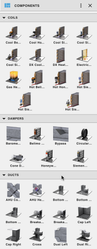
The components section contains multiple graphical components provided in the FIN Stack graphics library.
The Components panel also contains any saved Models or Animations the user may have previously saved/created in the graphics builder.

Layers
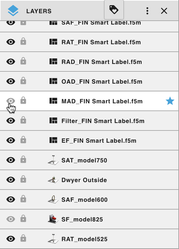
The Layers panel allows you to view all components/objects within your graphic file.
The lower an object is on this list, the lower it will be visually in the graphic. So if you need a graphic to be ontop of something else, place it higher in this list.
You can Show/Hide components by clicking on the "eye" next to its name in the layers.

You can also Lock or Unlock a component by clicking on the lock next to its name. Locking a component makes it non-selectable and can help from accidentally moving it while working on a graphic.

Virtual Points
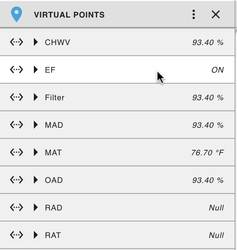
The Virtual points panel contains all of the points that have been brought into the current graphic. This menu allows you to do several different things.
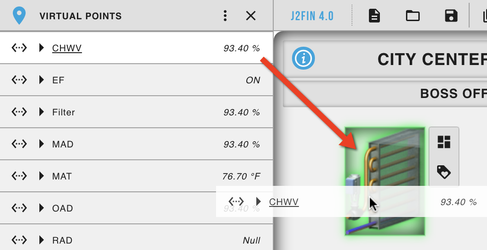
Create a Smart Label
You can create a Smart Label by dragging and dropping 1 or multiple points (ctrl+click or shift+click to multi-select) onto the empty workspace:
 →
→ 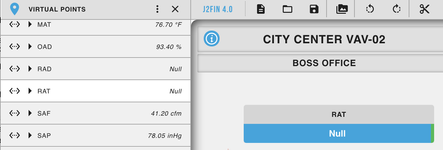
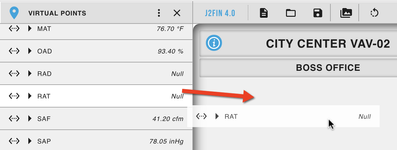
Binding Points
You can bind points to an object by dragging the point from the virtual point menu and then dropping it on top of the object:
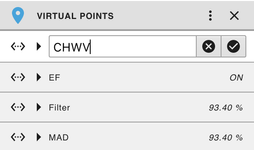
Editing & Tagging Virtual points
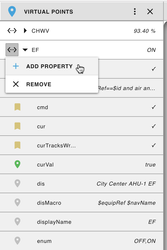
You can also add/remove/edit tags on your points via the Virtual Point panel when needed.
By clicking on the text you will be able to rename the point internally (this will not affect the name of the point outside of the graphic)
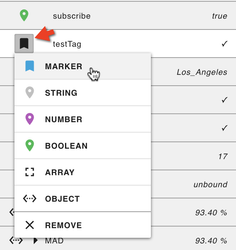
To add a new tag or property tag click on the <...> icon next to the points name, then name your tag. If it needs to be a certain type of property tag, click on the icon to the left of the tag name.
 →
→  →
→ 
Point Binding (Path)
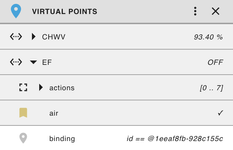
In this panel, one of the most important things you can see is a points binding path. This path determines how & where the select point gets its data from.
the property tag you want to look for to see this info is "binding" and can be found under any point that has binding info.
- Absolute points will have a hardcoded ID
When a point is brought in "Absolute by Point id" the path is automatically hardcoded to get data from that exact point no matter where the graphic is loaded. An example of a Room Temp's point binding, that was brought in 'Absolute by Point Id', will be as follows: id==@1eeaf884-82cd6356 . So if this same graphic is loaded on any other equipment it will always reference that exact specific point (id) in the database and load up that specific points data.
Absolute by Point IDs is recommended for graphics that are not relative, or will contain specific data from a piece of exact equipment. Some common examples that would utilize this setting would be Plants, specific 1-off equipment, and certain summary-style equip graphics.
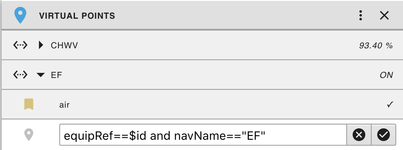
- Relative: By Tag points will have an equipRef and multiple tags

Relative By Tags makes it so that the points are relative based on their current tags. When points are relative, they are not "Hardcoded" to one set of equipment's data, they are relative and will load on any equipment that has similar points based on the points tags. An example of a Room Temp's point binding, that was brought in 'Relative By Tags', will be as follows: equipRef=$self and air and temp and point and zone . So if this same graphic is loaded on any VAV it will look for a point that has those same exact tags, and use that as the path to load up the points data.Relative By Tags is recommended for situations when your database has points from several similar equipments that do not share the same navName. This is common when using different brands where point names don't match. Instead of having to worry about each point having the same exact name, you can have them be relative by tags instead. NOT recommended for a server that is still being worked on where tags will be changing often.
- Relative: By navName points will have the equipRef and navName
Relative - By navName: This makes it so that the points automatically come in Relative, based on their current navName. When points are relative, they are not "Hardcoded" to one set of equipment's data, they are relative and will load on any equipment that has similar points based on the points navName. An example of a Room Temp's point binding, that was brought in 'Relative By navName', will be as follows: equipRef=$self and navName=="Room Temp" . So if this same graphic is loaded on any other equipment it will look for a point that has that same exact navName and use that as the path to load up the points data.
Relative By NavName is recommended for situations where you know your equipment's point names all match up, and your tags are going to be changing often. This allows your bindings to look for a navName instead of breaking every time a tag is changed. This is your safest route to having relativized graphic.
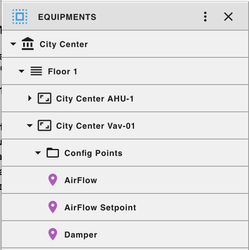
Equipment
The Equipment Panel allows for the user to view their database tree architecture. Users can drag/drop site/floor/equip/points from the panel tree into the graphic.
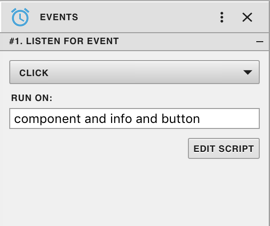
Events
Events menu shows you all of the events available within the graphic.
It also shows what type of event it is and what it's running on. Here you can add, delete, or edit any event.
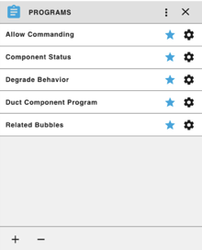
Programs
The program's panel contains all programs within the current graphic.
Here you can add, delete, or edit programs.