...
Completed Model (Basic)
Download: 2017041813582320170509104743.zip
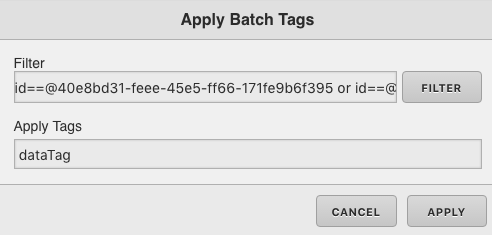
If downloading the model, tags still need to be added to select which points are displayed. To do this, go to the left menu and go to virtual points. Right click and hold down over the virtual points and select "Apply Batch Tags". Select which points you would like to appear in you dashboard component and select apply. Next under Apply Tags type dataTag and click Apply.
...
- Go to virtual points and right click to add batch tags
- Apply a tag on all the virtual points you want displayed called dataTag

- From components drag out Timer and add a tag on it called timer


- Bring Ractive out from components on the left side menu, and click on it to have the green outline
- Resize it to the desired length and width


- Under properties open the ractive editor, and copy and paste from the Ractive Code given above for template, model, style, and init
- After copying and pasting, should look like the screenshots below (the full code can be found above)


- After saving go to programs and add a new program


- Name your program, and set the program target filter to stackRactive
- Top right of program editor, click the three dots, and select variables
- Click the
+ to add a new variableClick the - gear that appears as you hover over
the new variableType timer on the first two lines- this
- turn Invokes the Function on and change the dropdown to Custom Event
- Type in
timer- obtainData in the line below and save
- Copy and paste the above code for
Program - program into the main part and save

- If your program does not already have Related Bubbles add a new program and copy and paste the code below into your program editor.
- Name your program Related Bubbles and set the Program Target Filter to virtualPointRef and (svg or finModel or alarmmanual) and not disableRelatedBubblesProgram
- Next click the three dots in the upper right hand corner and select variables
- Click the gear on this and turn on Invokes the function, select mouse events and click
- Click the + to add a new variable and click the gear to edit it
- Call the variable point and under the name add id==$virtualPointRef and click the gray save
Related Bubbles
Code Block language js theme Eclipse if (context.event.target.classList.contains("icon-gear")) return; if ("appOpen" in this) { // Open Application return; } var targetPoint = query("targetPoint"); var app = top.app; app.ShowRelatedBubbles(point, targetPoint, ("finModel" in this),context.event); - Save and you're done!