
Description
This component will return the weather. To work it must be placed on a site and have the proper weather tags.
Completed Model (Basic)
Download: ractiveWeather.f5m
Video
Example:
Ractive Code
Template
<table class="s-table" cellspacing="0" cellpadding="0">
    <tr>
     {{#myPointsMain}}
      <td class="s-left">{{cur_temp}}º<span class="s-temp">F</span></td>
      <td class="s-mid"><label class="{{icon}}" style= "font-size: 3em;"></label><br>{{iconText}}</td>
      <td class="s-right">Current Time: {{cur_time}}<br>
      {{myPointsLocation.geoCity}}, {{myPointsLocation.geoState}}<br>
      Humidity: {{cur_humidity}}%</td>
     {{/myPointsMain}}
    </tr>
    <tr>
        {{#myPoints}}
        <td class="s-bottom"><span style= "font-size: 12px;">{{date}}</span><br>
        <label class="{{icon}}" style= "font-size: 2em;"></label><br>
        {{(tempMin+tempMin)/2}}º
        </td>
        {{/myPoints}}
    </tr>
</table>
This sets up the HTML for the table
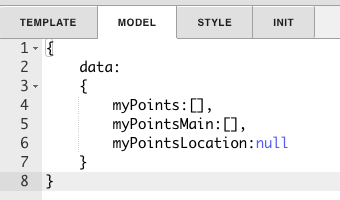
Model
{
    data:
    {
        myPoints:[],
        myPointsMain:[],
        myPointsLocation:null
    }
}
This sets up myPoints, myPointsMain, and myPointsLoaction to get the data from the query.
Style
.s-table{
  border-radius: 10px;
  background-color: #231f20;
  text-align: center;
}
.s-left{
  border-radius: 10px 0px 0px 0px;
  background-color: #3488b2;
  padding: 20px;
  font-size:60px;
  color:#ffffff;
  font-family:SourceSansPro-Light, Source Sans Pro;
}
.s-mid{
  background-color: #bcbec0;
  padding: 20px;
  font-size:18px;
  color:#fff;
  font-family:SourceSansPro-Light, Source Sans Pro;
}
.s-right{
  border-radius: 0px 10px 0px 0px;
  background-color: #ffffff;
  padding: 20px;
  font-size:16px;
  color:#231f20;
  font-family:SourceSansPro-Light, Source Sans Pro;
  text-align: left;
  line-height: 150%;
}
.s-bottom{
  padding: 10px;
  font-size: 18px;
  color:#ffffff;
  font-family:SourceSansPro-Light, Source Sans Pro;
}
.s-temp{
  font-size: 14px;
}
This is the css to style the table
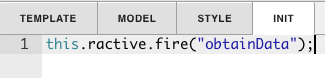
INIT
this.ractive.fire("obtainData");
obtainData is what connects the Ractive model to the program.
Program
var weather = this;
var myTarget = query('targetPoint');
finstack.eval('read(id=='+myTarget.pointId+').finWeatherData->forecast', function(data){
weather.myPoints=data.result.toObj();
});
var tableTop = this;
finstack.eval('read(id=='+myTarget.pointId+').finWeatherData', function(data){
tableTop.myPointsMain=data.result.toObj();
});
var myLocation = this;
finstack.eval('id=='+myTarget.pointId, function(data){
myLocation.myPointsLocation=data.result.toObj()[0];
});
This is where the program gets the data
How To Make your Own
- Bring Ractive out from components on the left side menu, and click on it to have the green outline


- Under properties open the ractive editor, and copy and paste from the Ractive Code given above for template, model, style, and init
- After copying and pasting, should look like the screenshots below


- After saving go to programs and add a new program

- Name your program, and set the program target filter to stackRactive
- Top right of program editor, click the three dots, and select variables
- Click the gear that appears as you hover over this
- turn Invokes the Function on and change the dropdown to Custom Event
- Type in obtainData in the line below and save
- Copy and paste the above code for program into the main part and save