Logic Builder Examples
- Christopher Simonian
- Kimberly Cruz (Unlicensed)
- Ricky Villa
- Gerard Huff (Unlicensed)
Basic Alarm - (Temp Overheat)
- Navigate down to the equip you want to create an alarm for
- Open Logic Builder tab and hit "new"
- Bring in your variables (in this case room temp)
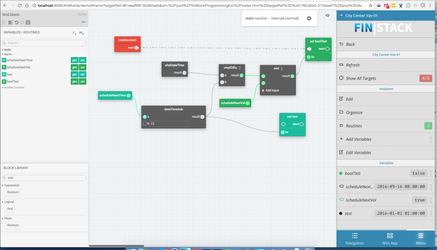
15 minutes delay
- scheduleNextTime is the dateTime of the next event
- scheduleNextVal is the value of what the schedule will do for the next event.
- boolTest was only made so you can have a bool value that will be true during the period you want. In this case it will only be true when the current site time is greater than the next time minus 15 minutes.
This will allow you to figure out how to do something 15 minutes before the schedule. Notice, I added an andGate too, cause you also want to make sure the next event is turning on, and not turning off.
Alternate value weekly
- Create program on equip and select to add point being commanded
- Then drag out the following blocks: siteDateTime, dateToNumber, isOdd or isEven (depending what you prefer)
- Then set up the logic like below.
Basically, in our example, we are saying if the current week of the year is odd, set the SF point to true. If not, it will be false.

Setting Point Value Before Schedule Time
Here is an example of how you can set the value of a fan to ON just 20 minutes before the schedule starts. You can download an example below made with variables and actual scheduleRefs.
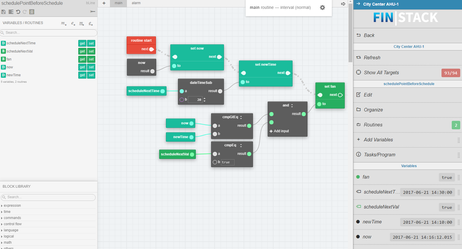
The variables that need to be created aside from your points to create this are:
- now (dateTime) - you need to create a dateTime variable that will be used to get the current time.
- newTime (dateTime) - this variable is needed so that we can subtract the start of the schedule time with however minutes we want the difference to be
The rest are found by creating a scheduleRef to the equip you wish to use this on and adding it either through "Tags" option when creating program or through Add Variable in right menu with program open.
Download the below program file.
Creating a Count Down
Here is an example of a count down created in Logic Builder. You can download an example below.
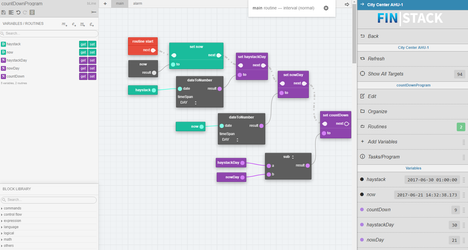
The variables needed are below and they can be either a virtual point or property tag from one of your available objects you are running this on. We just created variables in the program not live points.
- haystack (dateTime) - this variable is the date of the event we are counting down to.
- now (dateTime) - this is to get the current date and time
- haystackDay (numeric) - this is so that we convert the haystack variable to a number and based on days
- nowDay (numeric) - this is to covert now variable to a number and to make it based on days
- countDown (numeric) - this is where we subtract haystackDay from nowDay to get the remaining days to the event
Make sure you set the "DateToNumber" block and select the TimeSpan to "day" like below.

Compressor Staging
Here is an example where we want a particular compressor point to be switched on/off based on the value of a numeric point. You can download an example below.
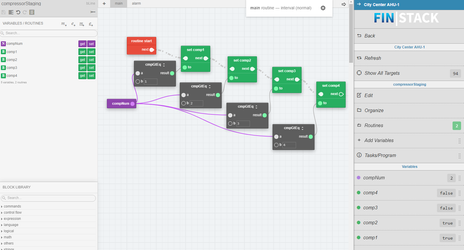
The points the will need to be created unless the user already has points they wish to use are the four boolean points.
Download the below program file.
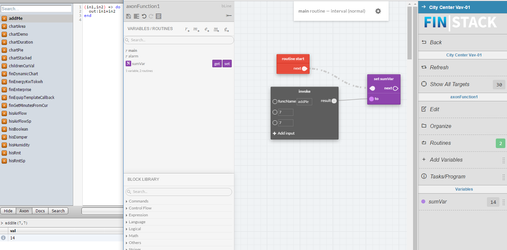
How to call a axon function via logicBuilder using invoke block
There are two ways and you'll need a newer version that contains either invokeBlock or codeMacroBlock. (Maybe v1832, for sure v2012).
First way is using an invokeBlock. As you can see we created a simple function that adds two parameters. In logicBuilder, we added the name on the function and two parameters and returned the same result as if we were to run it in folio/axon.
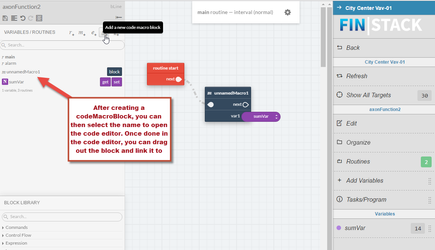
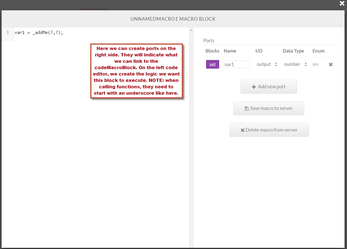
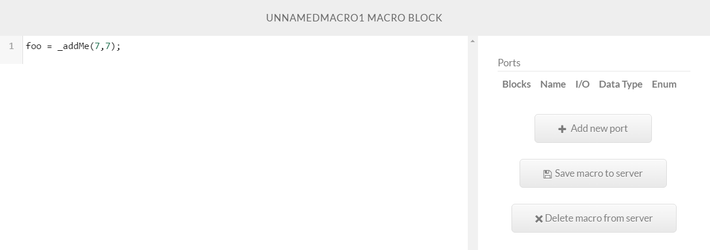
The second way is using a codeMacroBlock.
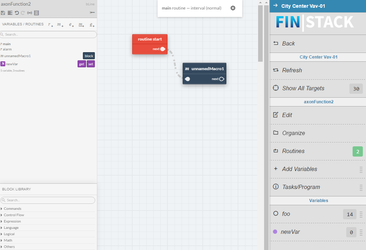
It can also be done without creating a variable like below. "foo" variable is define in the codeMacroBlock only and you can see that once the program is saved, it appears in the variables in them right menu. Only thing here is you need some other real variable there.
Trigger alarm based on value change
Value mismatch
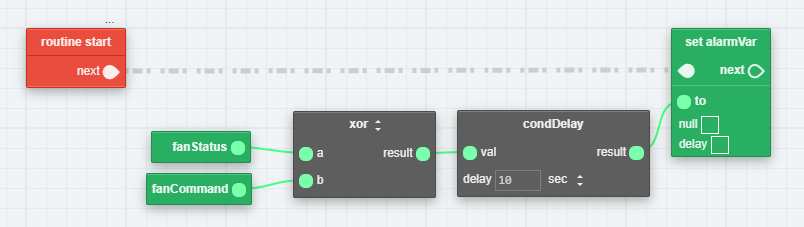
The logic below is for when the fan status and fan command don't match after 10 seconds.
Logic Flow: If fanStatus and fanCommand don't match after 10 seconds, set alarmVar variable to true, else false.
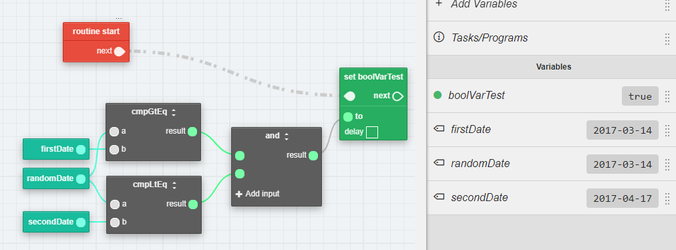
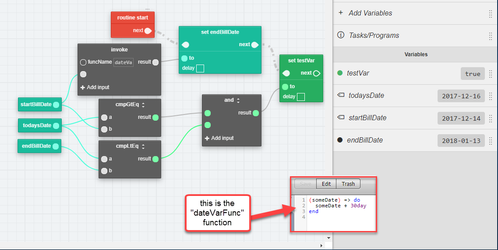
Find out if date is within date range period
Below is an example setup to check if a certain date is within some date range period.
Below is an example similar to the above, with a dynamic endDate. Created a simple function that adds 30 days to the startDate. Then used an invoke block to write to the endDate.
Master Schedule
If the user would like to use a master schedule to control the points based on holidays so that they don't have to change them on all schedules, they can do so with example below.
Note: By default if not changed, schedules write at level 15. Programs write to level 14. If priority levels have changed, make sure that the program writes at higher priority than the schedule for this to work.
- Create a new schedule that will be the master and has no default value. Configure schedule with holidays how you want. Note: No points are linked to this schedule, leave them in their respective schedules.
- Go to folio and query for "schedule" and select the master schedule to tag it as "masterSchedule"
- Add "masterScheduleRef" tag that references this new master schedule to all your equips you want to apply this to
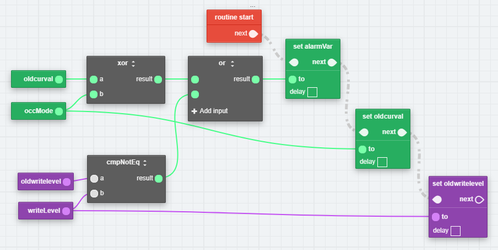
- Create a new program that uses the curVal of the masterSchedule to write to the schedule point. Below is an example logic.
- Logic Flow: If masterScheduleCurVal is false, set occMode (schedule point) to false else set to null.

- Reason we say if its false is because normally thats when the building is unoccupied and holiday values are set to false. This can be changed for different scenarios or create different program for different logic.
- Logic Flow: If masterScheduleCurVal is false, set occMode (schedule point) to false else set to null.
- Thats it, now if there is a holiday event, it would control the point and set it to off else it'll let the schedule control it.
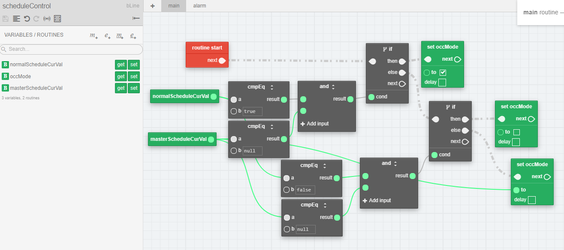
Another way would be to remove point scheduleRef by not making them schedulable anymore. Then applying a "normalScheduleRef" on the equip along with the "masterScheduleRef'. Then create the logic in the program to control the point solely by using the values of the schedule. That means the schedules won't have any points linked to them. You'll just have the schedules configured how you want them. The logic is below for something like this.
- If normalScheduleCurVal is true and masterScheduleCurVal is null, set occMode (schedule point) to true, else if normalScheduleCurVal is false and masterScheduleCurVal is null, then set occMode to false, else set occMode as masterScheduleCurVal.
- So basically its saying if there is a value on masterScheduleCurVal to control occMode, else don't and let the normalScheduleCurVal control it.
Delay and Advance Schedule Control
In this example, a customer had a point that was controlled by a schedule from 7 am to 7:15 pm. They wanted to delay turning on the point for another hour if the OAT was below 21 and shut if off 30 mins early. So basically turn the point on at 8 am and shut off at 6:45 pm. This can be accomplished with the below steps. Note: By default if not changed, schedules write at level 15. Programs write to level 14. If priority levels have changed, make sure that the program writes at higher priority than the schedule for this to work.
- First add a scheduleRef on the equip the program will be running on.
- Create a program and include the point to command (Occ Mode in our case), OAT, and schedule curVal and nextTime.
- Then create the logic like in the below screenshot.
- Then go to folio and query for "program" to see all the programs. Then select the one just created and tag it as 'useUnits' marker tag so that the dateTimeSub takes the units into consideration. Otherwise it'll just be minutes.
Logic Flow:
- Set nowTime variable as now. This is a dateTime variable I created and just linked the now block to it. Should return current time.
- Set earlyTime variable as now - time. This is a time variable to get the time from now (displays current time).
- Set newTime variable as scheduleNextTime - 11.25 hr. This is a dateTime variable just for visual representation. Should return 8 am depending on scheduleNextTime. (.25 is % of 60 = 15 mins)
- If earlyTime is greater than or equal to setTimeOne (6:59:00 am) AND earlyTime is less or equal to setTimeTwo (7:00:00 am) AND scheduleCurVal is false, set tempVar to be roomTemp value. (tempVar is just a number variable created, this part is to get the current value of OAT at 6:59 am before schedule kicks in at 7 am)
- Continue from 4, else if nowTime is less than or equal to scheduleNextTime - 11.25 hr AND scheduleCurVal is true AND tempVar is less than or equal to 21, set occMode to false. (this part is control the occMode to off until 8 am, an hour after schedule kicked in. Then release it and let the schedule control it after.)
- Continue from 5, else if nowTime is greater than or equal to scheduleNextTime - 30 mins AND scheduleCurVal is true AND tempVar is less than or equal to 21, set occMode to false, else null. (this part is to control the occMode and shut it off 30 mins earlier at 6:45 pm than the schedule at 7:15 pm. then release it and let the schedule control it after that time.)

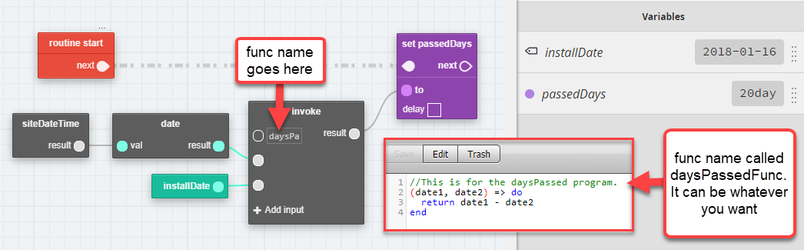
Days Passed
A customer wanted to know how many days there were between two dates. Below is a simple example that achieves this.
Create a simple function with below source and then invoke that through logic builder using the 'invoke' block.
Function:
(date1, date2) => do
return date1 - date2
end
Then link the dates to it and it will return you the number of days on the number block.
Unit Staging Type 1
Below is an example of how to stagger units on with 10 second intervals and after the schedule is set to occupied. There are two programs involved. One runs on the equips, which controls the occupancy point based on the stage. Then the second one runs on the site that handles all the staging.
Tag setup
- The user would first tag all the equips they wish to include in the staging. They would tag them with a numeric tag called 'stageOrder' and number them accordingly in the order you would want them to turn on.
- Then on the site add 4 tags below:
- currentStage (numeric) - set this to 1 for now (this will be dynamic and controlled by the site program)
- maxStages (numeric) - set this to 1 for now (this will be dynamic and controlled by the site program)
- stageTimer (numeric) - set this to however long you would like to delay each unit (its in seconds - put 60 for 1 min etc). This is optional to add, you can set it on the stagingBlock in the program if you prefer. By tagging it you can control it from the site.
- scheduleRef (ref) - set this to the schedule in which the units currently assigned to.
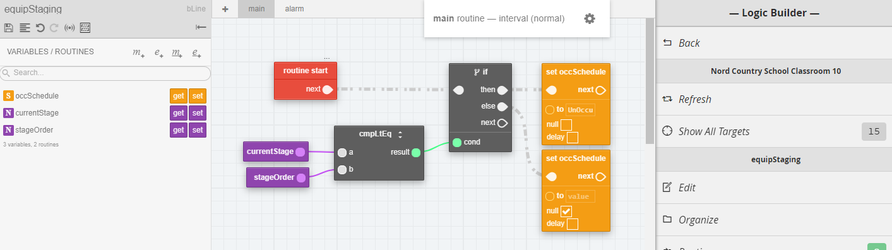
Program 1 - Equip Staging
- Create a program that runs on the equips to be staggered when schedule is active. It can be something like 'equip and stageOrder'.
- Add the point to be controlled, stageOrder (tag on equip), and currentStage (tag on site) to the program as variables
- Create the logic to be like below.
Logic Flow:
- Set occSchedule (point to be controlled) to UnOccupied IF currentStage is less than or equal to stageOrder, else null.
Program 2 - Stage Commanding
- Create a program that runs on the site. It can be something like 'site'.
- Add equipStaging bundle, currentStage, maxStages, stageTimer, and scheduleCurVal to the program as variables.
- Also create a new number variable called 'maxStagesVar' in the program and set it to 0.
- Create the logic to be like below.
Logic Flow:
- Set maxStages as equipStaging bundle > gridSize + addBlock to add 1.
- Next Set currentStages as scheduleCurVal = Occupied -> stageUp + stageTimer -> stageUpDelay + maxStagesVar -> maxStages (all linked to stagingBlock)
- Next IF scheduleCurVal is not equal to Occupied, Set maxStagesVar to 0, else Set as maxStages.

Thats it, now if the schedule is occupied, the staging block will increment the currentStage variable until it reaches the maxStages limit + 1. That will turn on the units one after the other until currentStage is past the stageOrder limit on that particular unit, then it'll release the point and let the schedule control it.
Unit Staging Type 2
Here are few examples on how to stage multiple units. A customer has four units on the same schedule, but didn't want them all to turn on at the same time. They wanted to stage them 10 minutes apart. Below are the options.
- The first option executes every day at 6 am regardless of schedule. So its hardcoded to the specific time on schedTime. Would have to be changed if schedule is to be changed.
- The second option executes only if schedule curVal is Occupied AND inRange is true, which would only execute based on the schedule days when set to Occupied. But still hardcoded to the schedTime var configured because if schedule is adjusted, the user would have to change the time in the program as well.
- The third option executes based on schedules time and duration configured to delay the units. This makes it dynamic based on the schedule time and curVal. The schedule can be changed and it'll still work without remodifying program like the first two options.
Note: By default if not changed, schedules write at level 15. Programs write to level 14. If priority levels have changed, make sure that the program writes at higher priority than the schedule for this to work.
Option 1
- Create program to run on units
- Add points to control as Absolute (hardcoded to id). In this case we only want to bring in points from units 2-4 since the first one starts from the schedule.
- Create two time variables.
- nowTime - this variable is used to get the current time. (its just for visual representation, no need to create it. In the logic below, we would just link the "time" block to second input of "timeToTimeAdd" block)
- schedTime - this variable is used to specify the schedule start time which in our case is 6 am
- Then configure the below logic and done.
Logic Flow:
- Set nowTime variable as now + time. This will get the current time.
- IF schedTime + nowTime (using timeToTimeAdd block) are inRange of min=0 and max=10, then set Unit 2 to UnOccupied else null. (The timeToTimeAdd block returns duration in minutes so we look if its within 10 mins. If its not, it writes null which means it lets the schedule control it again)
- Next IF schedTime + nowTime (using timeToTimeAdd block) are inRange of min=0 and max=20, then set Unit 3 to UnOccupied else null.
- Next IF schedTime + nowTime (using timeToTimeAdd block) are inRange of min=0 and max=30, then set Unit 4 to UnOccupied else null.
Option 2
- Follow Option 1 steps but when adding points, also add the schedule curVal. (this means you want to add a scheduleRef on the target equips this program is running on)
Logic Flow:
- Set nowTime variable as now + time. This will get the current time.
- IF schedTime + nowTime (using timeToTimeAdd block) are inRange of min=0 and max=10 AND scheduleCurVal is equal to Occupied, then set Unit 2 to UnOccupied else null. (The timeToTimeAdd block returns duration in minutes so we look if its within 10 mins. If its not, it writes null which means it lets the schedule control it again)
- Next IF schedTime + nowTime (using timeToTimeAdd block) are inRange of min=0 and max=20 AND scheduleCurVal is equal to Occupied, then set Unit 2 to UnOccupied else null.
- Next IF schedTime + nowTime (using timeToTimeAdd block) are inRange of min=0 and max=30 AND scheduleCurVal is equal to Occupied, then set Unit 2 to UnOccupied else null.

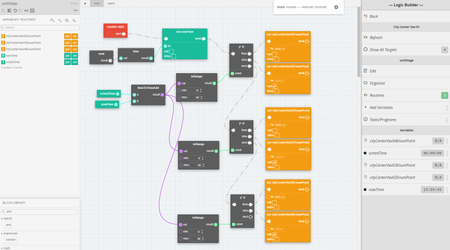
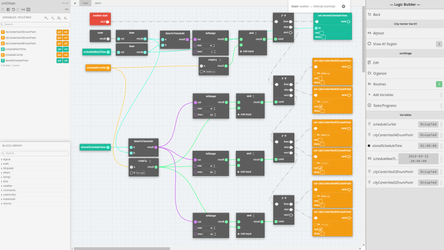
Option 3
- Create program to run on units
- Add points to control as Absolute (hardcoded to id). In this case we only want to bring in points from units 2-4 since the first one starts from the schedule. Include scheduleRefs (on equip) curVal and nextTime variables.
- Create a time variable. We called it "storedScheduleTime".
- Then configure the logic below.
Logic Flow:
- IF nowBlock + timeBlock add (use timeToTimeAdd block) to scheduleNextTime + timeBlock are inRange of min=0 and max=1 AND scheduleCurVal is UnOccupied, then set storedScheduleTime to scheduleNextTime + timeBlock. (We are getting the current time and schedule time from the dateTime format and adding them up. If they are within range and schedule curVal is Unoccupied, store the current schedules time. Reason we want to store the schedule time is because once the schedule time is reached, it changes to the next time, which would no longer be useful. So we capture the time before it changes.)
- Continue from 1, Else IF storedScheduleTime add to nowBlock + timeBlock are inRange of min=0 and max=10 AND scheduleCurVal is Occupied, then set Unit 2 to UnOccupied, else null. (After capturing the scheduleTime, we now add that with now time to get a number value. For every minute, it'll go up one. So 10 = 10 mins. At this point, the schedule would also be Occupied since it reached the time, so we include the parameter in there to check.)
- Continue from 2, Else IF storedScheduleTime add to nowBlock + timeBlock are inRange of min=0 and max=20 AND scheduleCurVal is Occupied, then set Unit 3 to UnOccupied, else null.
- Continue from 3, Else IF storedScheduleTime add to nowBlock + timeBlock are inRange of min=0 and max=30 AND scheduleCurVal is Occupied, then set Unit 4 to UnOccupied, else null.
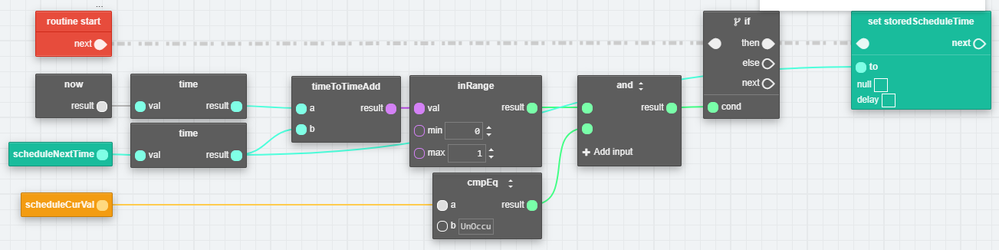
Capturing Schedule Time
Below is an example of how to capture the schedule start time dynamicly to then be able to use for other logic if needed. The reason this would be needed is because the schedule nextTime changes as the time is reached. For example, if a schedule has an event from 7 am to 4 pm and nextTime is 7 am. Once 7 am comes around, the nextTime changes to 4 pm, but we need to execute logic based on 7 am or whatever we change the schedule to be. The below is only how to capture it before using it with whatever logic. Then the user can link to the else of the IF block to do their logic. An example of this being used can be found in the above example under "Unit Staging" option 3.
Example is based on an enum value schedule. It can be changed to whatever type of schedule is being used.
Logic Flow:
- IF nowBlock + timeBlock add (use timeToTimeAdd block) to scheduleNextTime + timeBlock are inRange of min=0 and max=1 AND scheduleCurVal is UnOccupied, then set storedScheduleTime to scheduleNextTime + timeBlock. (We are getting the current time and schedule time from the dateTime format and adding them up. If they are within range and schedule curVal is Unoccupied, store the current schedules time. Reason we want to store the schedule time is because once the schedule time is reached, it changes to the next time, which would no longer be useful. So we capture the time before it changes.)
Heating and Cooling Degree Days with weatherRefs
Here is an example to evaluate Heating Degree Days (HDD) and Cooling Degree Days (CDD) using weather information base on the specific site.
Degree days are evaluates as the difference between the daily temperature mean and 65°F (18 °C). If the temperature mean is above 65°F, we subtract 65 from the mean and the result is Cooling Degree Days. If the temperature mean is below 65°F, we subtract the mean from 65 and the result is Heating Degree Days. , The daily temperature mean is calculated dividing by two the sum of high temperature and low temperature.
- Firstly, the user will set the desired location using the Weather app, following this guide.
- Then the user has to set into the DB Builder the weatherReference tag on the site to which the equip that will be the target of the logic belongs.
In the suggested refs he will find the locations previously set up in the Weather app.
- Download the below program file and upload it into your project
- Open the program into the Logic Builder, set the correct "programOn" and binding the variables based on your specific project. The logic looks like the image below:
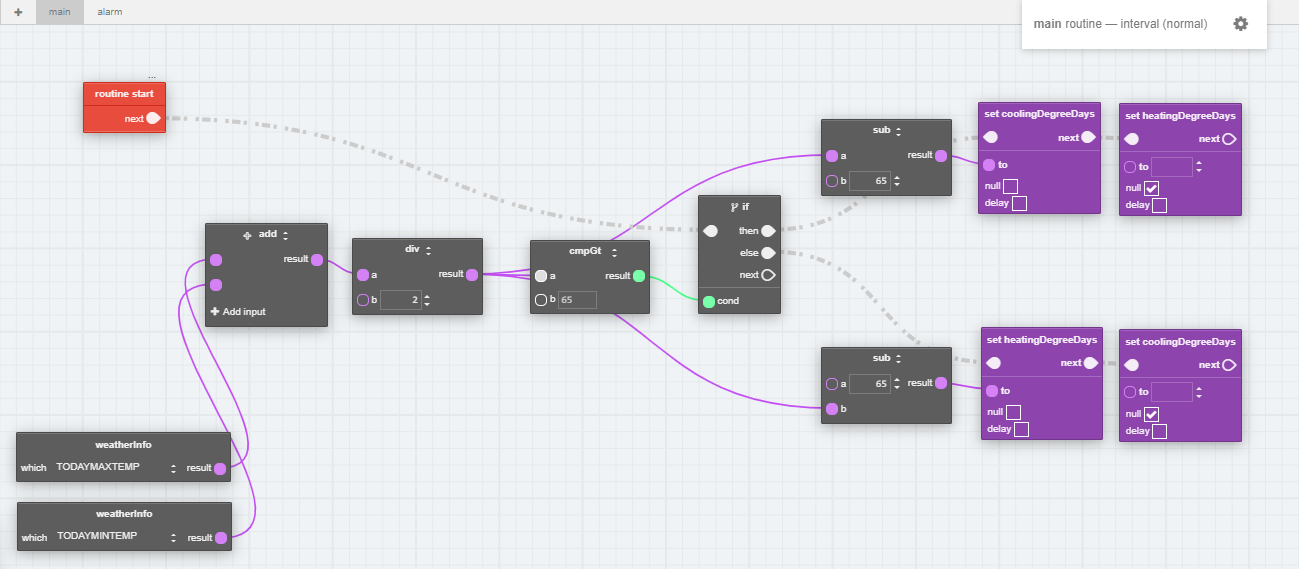
N.B.
- HDD and CDD in this example have been evaluated based on the today max temperature and today min temperature. The user can change this input replacing the blocks about weatherInfo into the logic.
- Reference for HDD and CDD into the logic example is °F. If the user has temperatures given in °C, he has just to replace the value 65 in the "cmpG