Ractive Magic Bubbles Drop Down
- Sarah Padilla (Unlicensed)
Owned by Sarah Padilla (Unlicensed)
Last updated: Oct 11, 2017
Description
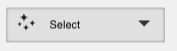
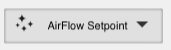
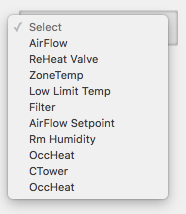
This drop down menu will pull up the magic bubbles for whatever point is selected.
Completed Model (Basic)
Download: magicBubblesDropdown.zip
Video
Example: Video.mov
Ractive Code
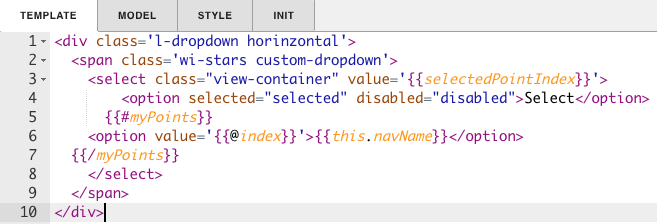
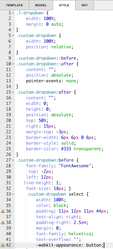
Template
<div class='l-dropdown'>
  <span class='wi-stars custom-dropdown'>
    <select class="view-container" value={{selected}} on-change='selectedPointIndex'>
        <option selected="selected" disabled="disabled">Select</option>
      {{#myPoints}}
    <option value='{{this.id}}'>{{this.navName}}</option>
  {{/myPoints}}
    </select>
  </span>
</div>
This sets up the drop down menu
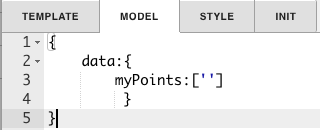
Model
{
    data:{
        myPoints:['']
         }
}
This sets up myPoints to get the data from the query.
Style
.l-dropdown {
    width: 100%;
    margin: 0 auto;
}
.custom-dropdown {
    width: 100%;
    position: relative;
}
.custom-dropdown::before,
.custom-dropdown::after {
    content: "";
    position: absolute;
    pointer-events: none;
}
.custom-dropdown:after {
    content: "";
    width: 0;
    height: 0;
    position: absolute;
    top: 50%;
    right: 15px;
    margin-top: -3px;
    border-width: 6px 6px 0 6px;
    border-style: solid;
    border-color: #333 transparent;
}
.custom-dropdown:before {
    font-family: "FontAwesome";
     top: -2px;
    left: 12px;
   line-height: 1;
    font-size: 18px; }
    .custom-dropdown select {
        width: 100%;
        color: black;
        padding: 11px 12px 11px 44px;
        text-align: right;
        padding-right: 2.5em;
        margin: 0;
        font-family: helvetica;
        text-overflow: '';
        -webkit-appearance: button;
    }

    .custom-dropdown select:focus {
        outline: none;
    }
    .custom-dropdown select option:first-child {
        text-transform: uppercase;
    }
    .custom-dropdown select[disabled] {
        color: rgba(0, 0, 0, 0.3);
    }
    .custom-dropdown select[disabled]::after {
        color: rgba(0, 0, 0, 0.1);
    }
    .custom-dropdown::after {
        color: #3333;
    }
This is the css to style the list
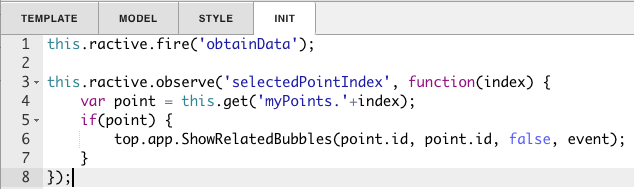
INIT
this.ractive.fire('obtainData');
 var self    = this;
var template = this;
var model   = self.ractive;
this.ractive.on('selectedPointIndex', function(event) {
    var point   = model.get("myPoints");
    var selected   = model.get("selected");
    if(selected) {
        top.app.ShowRelatedBubbles(selected, selected, true, event);
    }
});
obtainData is what connects the Ractive model to the program. The function selectedPointIndex is for the gears and magicB is for the magic bubbles.
Program
var targetPoint = query('targetPoint and virtualPoint');
var dataPoints = this;

finstack.eval(interpolate(this.dataQuery ,targetPoint), function(data){
  dataPoints.myPoints=data.result.toObj();
});
This is your program, It sets the query equal to your ractive component
How To Make your Own
- Bring Ractive out from components on the left side menu, and click on it to have the green outline

- Under properties open the ractive editor, and copy and paste from the Ractive Code given above for template, model, style, and init
- After copying and pasting, should look like the screenshots below
- After saving go to programs and add a new program
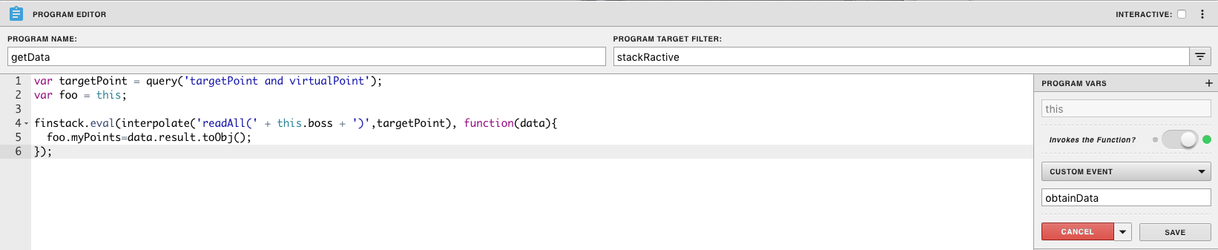
- Name your program, and set the program target filter to stackRactive
- Top right of program editor, click the three dots, and select variables
- Click the gear that appears as you hover over this
- turn Invokes the Function on and change the dropdown to Custom Event
- Type in obtainData in the line below and save
- Copy and paste the above code for program into the main part and save
- With your ractive component selected, go to your properties menu on the left side and select advanced:

- click the plus + at the bottom left in the left hand properties menu
- In this example we set dataQuery equal to readAll(point).get(0..4)
- dataQuery can be changed to any name as long as it matches the program editor (line 4 in the program editor screenshot)
- Save and you're done!
, multiple selections available,